Bathroom Sink Plumbing: Mastering 2-Hour DIY
Bathroom Sink Plumbing in Riverside: Your DIY Guide
Bathroom sink plumbing is one of the most approachable DIY projects you can tackle, involving just a few key components that connect your water supply to the sink and drain water away safely. Whether you’re installing a new vanity in your South Corona home or updating an outdated sink in a classic Eastvale neighborhood, understanding how these systems work can save you time and money.
Quick Overview: What You Need to Know
- Two Main Systems: Water supply (brings clean water in) and drainage (removes wastewater)
- Key Components: Shut-off valves, supply lines, P-trap, drain tailpiece, and pop-up assembly
- Standard Sizes: 1-1/4″ drain pipes for bathrooms, 3/8″ or 1/2″ water supply lines
- Estimated Time: 2-3 hours for a complete installation
- Estimated Cost: $150-$500 depending on materials and complexity
- Essential Tools: Basin wrench, adjustable wrench, pliers, Teflon tape, plumber’s putty
Many homeowners throughout Riverside County, from the horse trails of Norco to the family-friendly streets of Eastvale, find that bathroom sink plumbing is a great first step into home improvement. Unlike major renovations, this project requires basic tools, a few standard parts, and careful attention to connections.
Always put safety first. Turn off your water supply before starting work, keep a bucket handy to catch residual water, and wear safety glasses when cutting pipes or working under the sink. Take your time with each step—rushing leads to leaks and frustration.
I’m Chris Kirsten, and with four decades of experience at Professional Plumbing IE Inc., I’ve helped countless Riverside County homeowners with bathroom sink plumbing projects, from simple faucet upgrades in Canyon Crest to complete vanity installations in Jurupa Valley. This guide will walk you through the essentials, so you understand both the water supply and drainage systems that make your bathroom sink function properly.
 on the left side, and the drainage system (including drain assembly, tailpiece, P-trap, and wall connection) on the right side, with clear labels and arrows showing water flow direction - bathroom sink plumbing infographic")
Under the Hood: Anatomy of Your Bathroom Sink Plumbing
Before we dive into installation, it helps to get familiar with the basic anatomy of your bathroom sink plumbing. Whether you’re peering under a pedestal sink in a historic Wood Streets home in Riverside or into a vanity cabinet in a new Jurupa Valley build, the core components are the same. Knowing what each part does makes every repair or upgrade easier.
At its core, bathroom sink plumbing has two main systems: the water supply and the drainage. The water supply brings clean, fresh water to your faucet, while the drainage system carries wastewater away. For a deeper understanding of how these systems integrate into your home, you can refer to this guide on understanding the plumbing of the bathroom sink. If you’d rather have an expert handle it, we also offer comprehensive plumbing fixture installation services.
Key Components and Their Functions
- Sink Drain and Pop-Up Drain Assembly: This is where water exits your sink basin. The pop-up drain assembly lets you open and close the drain, usually with a lift rod behind the faucet. For bathrooms, pop-up drains are common and homeowner-friendly. If you’re replacing your sink or the existing pop-up drain is damaged, it’s a good time to swap it out.
- Tailpiece: Directly beneath the sink drain, the tailpiece is a straight section of pipe that connects the drain assembly to the rest of the drainage system. It’s the first vertical segment of your drain line.
- P-trap: This U-shaped pipe is a critical part of your drainage system. It always holds a small amount of water, forming a barrier that blocks unpleasant and potentially harmful sewer gases from entering your home. The P-trap also has slip-nut joints that allow for easy disassembly, which is handy for retrieving dropped items or clearing clogs.
- Shut-off Valves: Located on the water supply lines under the sink, these valves control water flow to the faucet. You’ll usually see two: one for hot water and one for cold. They let you shut off water to the sink for repairs or maintenance without affecting the rest of your home, whether you’re in Corona near the 91 freeway or out on the horse trails of Norco.
- Water Supply Lines: These flexible or rigid tubes connect the shut-off valves to your faucet. They deliver the hot and cold water that mix to your desired temperature. For a dual-handle sink, each handle connects directly to a hot or cold line; for a single-handle sink, a mixing valve inside the faucet regulates temperature before the water reaches the spout.
- Faucet Connections: These are the points where the water supply lines attach to the faucet body, usually via threaded shanks extending from the bottom of the faucet.
- Gaskets and Washers: These small components create watertight seals at various connections throughout your bathroom sink plumbing. A rubber gasket prevents water from leaking between the sink and the drain assembly, while washers in slip-nut joints help ensure a tight, leak-free connection between pipes. Make sure washers are correctly seated, sometimes with a beveled side facing outwards, to get a proper seal.
Knowing these parts will make any repair or installation project clearer and help you communicate effectively if you ever need to call us for service in a newer community like The Preserve at Chino or an established neighborhood in Jurupa Valley.
Gearing Up: Tools, Materials, and Sizing
Alright, DIY warriors—before you get started, gather what you need. Having the right tools and materials on hand is half the battle for a smooth bathroom sink plumbing installation. That way you can avoid mid-project runs to the Lowe’s in Corona or the Home Depot in Eastvale.

Here’s what you’ll need:
- Plumber’s Putty: A pliable, waterproof sealant for creating a watertight seal between your sink’s drain collar and the sink basin.
- Teflon Tape (Pipe-thread tape): For threaded connections, this helps create a watertight seal and prevents leaks where pipes screw together.
- P-trap Kit: Usually includes the P-trap plus slip nuts and washers. Choose PVC, brass, or semi-cast based on your preference and existing plumbing.
- Water Supply Tubes: Two flexible supply tubes (one hot, one cold) to connect your shut-off valves to the faucet.
- Bucket and Rags: To catch residual water when you disconnect pipes and for quick cleanups.
- Safety Glasses: Always protect your eyes.
- Hacksaw or Tubing Cutter: For cutting plastic or metal pipes to length if needed.
- Slip-Joint Pliers (ChannelLocks): Your go-to for gripping and tightening pipes and nuts.
- Adjustable Wrench: Helpful for securing nuts, especially on water supply lines.
- Basin Wrench: A specialized tool for tightening nuts in tight spaces, especially faucet connections under the sink. You can find these tools at your local hardware store or online:
How to Choose the Correct Size Plumbing Parts
Choosing the correct size parts for your bathroom sink plumbing is vital for a leak-free, efficient system. Fortunately, bathroom plumbing is fairly standardized.
- Drain Pipe Diameter: Bathroom sink drainage pipes are typically 1-1/4 inches in diameter. You might occasionally see 1-1/2 inch pipes, especially in older installations or where a larger size was used to match nearby plumbing, but 1-1/4 inch is the standard for bathroom lavatories in most newer homes from Eastvale to classic ranch houses in Riverside.
- Water Supply Line Sizes: Water supply lines commonly come in 3/8-inch and 1/2-inch diameters. The size you need depends on your faucet and shut-off valves. Many modern faucets are designed for 3/8-inch supply lines, but always check your faucet’s specs or measure existing connections. Some kits include adapters for flexibility.
- Measuring for Your Sink: When replacing existing plumbing, measure the diameter of your current drain tailpiece and water supply lines to ensure compatibility. For a brand-new sink, consult the manufacturer’s specifications. When cutting any pipe, measure twice and cut once. For floor outlet connections, it’s a good idea to add about an inch to your measurement so the pipe extends far enough into the adapter for a proper seal.
Here’s a quick comparison to help you distinguish typical bathroom vs. kitchen plumbing sizes:
| Plumbing Component | Typical Bathroom Sink Diameter | Typical Kitchen Sink Diameter |
|---|---|---|
| Drain Pipe | 1-1/4 inches | 1-1/2 inches |
| Drain Opening | 1-1/2 to 1-3/4 inches | 3-1/2 inches |
| Water Supply Lines | 3/8 inch or 1/2 inch | 3/8 inch or 1/2 inch |
The drain opening in a kitchen sink is usually 3-1/2 inches—much larger than a bathroom sink’s opening (around 1-1/2 to 1-3/4 inches)—to accommodate basket strainers and garbage disposals. This refers to the opening in the sink itself, not the drain pipe diameter underneath.
The Main Event: A Step-by-Step Installation Guide
Now it’s time to install your bathroom sink plumbing. This guide assumes your sink bowl is already in place and you have existing wall plumbing ready to connect. Our team often handles bathroom plumbing projects for clients in new homes in Eastvale’s master-planned communities and classic houses in Corona, but with some patience you can take this on yourself.
Before you begin, keep these basics in mind:
- Safety First: Turn off the main water supply to your house or at least the shut-off valves under the sink.
- Contain the Mess: Place a bucket directly under your work area to catch residual water from pipes or the P-trap. Have rags handy for spills.
- Clear the Area: Make sure you have enough space to work comfortably under the sink.
For a general overview, you can also check this guide on how to easily connect the plumbing for a new bathroom sink.
Step 1: Installing the Sink Drain and Tailpiece
This first step sets up your drainage system and connects directly to your sink basin.
- Remove Old Drain (if applicable): If you’re replacing an existing drain, loosen the large nut on the underside of the sink that holds the drain assembly in place. You may need a basin wrench. Carefully pull the old drain out from the top.
- Clean the Sink Opening: Thoroughly clean the drain hole in your sink basin. Remove any old plumber’s putty or sealant so the new drain can seal properly.
- Apply Plumber’s Putty: Roll a thin rope of plumber’s putty (about 1/2 inch thick) and wrap it around the underside rim of the new pop-up drain assembly where it will meet the sink.
- Install the Pop-Up Drain: Insert the top part of the drain assembly (with the putty) into the sink’s drain hole from above. Press down firmly to create a seal, making sure the lift rod opening (if applicable) faces the back of the sink, toward the faucet.
- Attach the Tailpiece and Tighten: From underneath, attach the rubber gasket, friction washer, and then the large locknut onto the threaded portion of the drain assembly. Hand-tighten, then use a basin wrench to give it another quarter to half turn until the putty squeezes out from under the drain rim. Wipe away excess putty. Slide the tailpiece onto the bottom of the drain assembly and secure it with a slip nut and washer.
For detailed instructions on installing various pop-up drains, including Oatey models, follow these instructions.
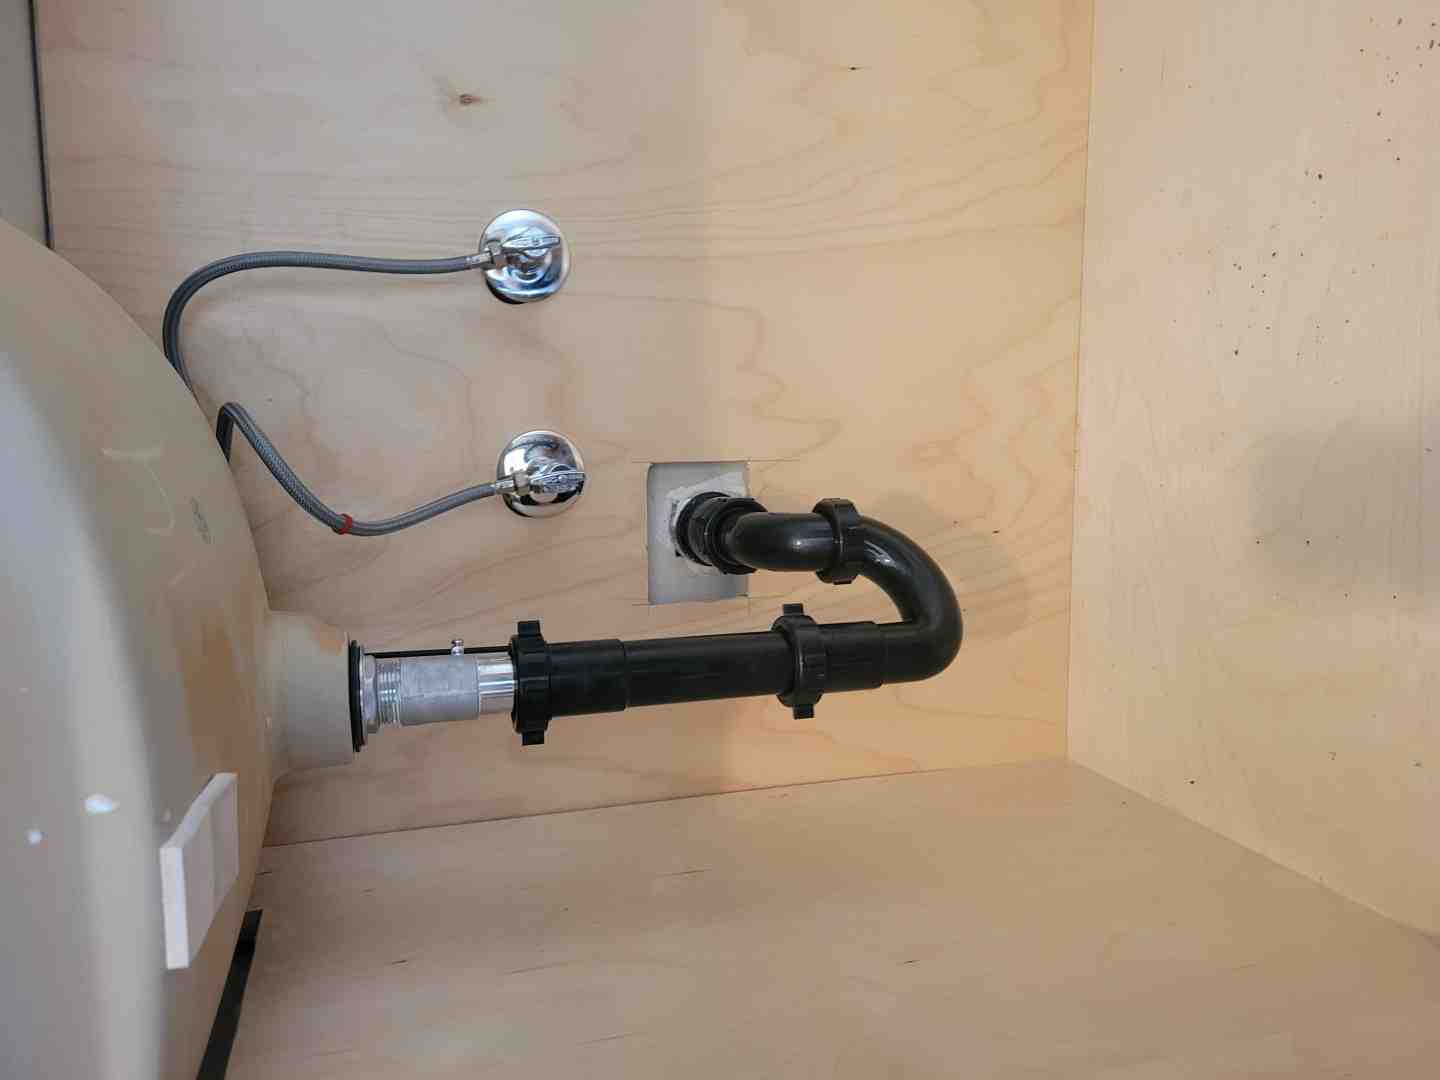
Step 2: Assembling the P-Trap
The P-trap protects your home from sewer gases and helps catch debris.
- Connect to the Tailpiece: Slide a slip nut, then a washer, onto the bottom of your sink’s tailpiece. Connect the P-trap bend to the tailpiece and secure it with the slip nut, making sure the washer is properly seated.
- Connect to the Wall Drain Pipe: Your wall (or floor) has a drain pipe (stub-out or trap adapter) extending from it. Slide another slip nut and washer onto this pipe. Connect the horizontal arm of the P-trap to this wall pipe and secure it with the slip nut. If the wall outlet is offset, you may need a flexible extension tube. The bend of the P-trap should always be below the level of the wall drain pipe so it can hold water.
- Tighten Connections: Hand-tighten all slip nuts first. Once snug, use slip-joint pliers to give each nut an additional quarter-turn. Avoid over-tightening, which can crack plastic pipes or strip threads.
For a visual walk-through, you can watch how to install a P-Trap here.
Step 3: Connecting the Water Supply Lines
Connecting the water supply lines is the final step before testing your new bathroom sink plumbing.
- Connect to Shut-Off Valves: Confirm that your hot and cold shut-off valves are in the “off” position. Attach one end of your new flexible supply lines to the threaded connections on the shut-off valves. Hand-tighten the coupling nuts, then use an adjustable wrench or pliers to snug them down an additional quarter-turn. Do not overtighten.
- Connect to Faucet Shanks: Guide the other ends of the supply lines up to the threaded shanks extending from the bottom of your faucet. Connect the hot supply line to the hot (usually left) faucet shank and the cold supply line to the cold (usually right) shank. Hand-tighten first, then use your basin wrench or adjustable wrench to give them a snug quarter-turn.
After all connections are made, double-check for tightness. For more on faucet work, see our faucet repair in Riverside complete guide.
Troubleshooting, Tips, and Local Riverside County Codes
Even when you follow every step, plumbing projects can surprise you. Here are common bathroom sink plumbing issues you might encounter, plus a quick look at local code considerations in Norco, Eastvale, Riverside, and nearby cities. Knowing the signs that your plumbing is failing can also help you catch problems early.
How to Resolve Common Bathroom Sink Plumbing Issues
- Leaks at Connections: After installation, slowly turn on your shut-off valves and then the faucet. Inspect all connections—drain assembly, tailpiece, P-trap, and supply lines—for drips.
- Drain connections: Gently tighten the slip nut a bit more. If it still leaks, disassemble, check the washer (make sure it’s not damaged and is correctly seated), and reassemble. Plumber’s putty at the drain opening is usually enough when properly applied.
- Supply line connections: Gently snug the coupling nut with your wrench. If the leak persists, turn off the water, disconnect, inspect the rubber O-ring or cone washer inside the nut for damage, and make sure it’s properly seated.
For more detail, our bathroom sink leak repair guide can help.
- Slow Drains and Clogs: Slow draining is often due to hair, soap scum, or debris buildup in the P-trap or tailpiece.
- Fix: Place a bucket under the trap, then disassemble the P-trap and clean out any gunk. You can also use a small plumbing snake or hair-snare tool for blockages farther down the line. Avoid harsh chemical drain cleaners, especially on older pipes.
- Gurgling Sounds: A gurgling sound when your sink drains often points to a venting issue, where air isn’t entering the drain pipe properly.
- Fix: Check for partial clogs in the drain line. If you have an Air Admittance Valve (AAV), make sure it isn’t stuck or faulty. Persistent problems may indicate a more complex venting issue that needs professional attention.
- Low Water Pressure: If your faucet is barely trickling, a few common culprits are easy to check.
- Fix: Confirm your shut-off valves under the sink are fully open. Unscrew and clean the aerator at the tip of the faucet spout; mineral buildup there is common in hard-water areas like Riverside and Norco. If that doesn’t solve it, the faucet cartridge or internal seals may need service.
Bathroom vs. Kitchen Sink Plumbing: Key Differences
Bathroom and kitchen sinks both use water supply and drainage systems, but they’re set up differently because of how they’re used.
- Pipe Diameter: Bathroom sink plumbing typically uses 1-1/4 inch diameter drain pipes. Kitchen sinks, which handle more water and food waste, almost always use 1-1/2 inch drain pipes.
- Drain Assembly: Bathroom sinks usually feature a pop-up drain assembly you can open and close with a lever or push-button. Kitchen sinks use basket strainers to catch food debris and often connect to a garbage disposal.
- Garbage Disposal Connections: Garbage disposals are almost exclusive to kitchen sinks and require specific plumbing connections integrated into the drain assembly.
If you’re looking at DIY guides for kitchen sinks, remember these differences before applying them to your bathroom. For a detailed look at kitchen installations, see this guide on how to install the plumbing for a kitchen sink.
A Note on Local Plumbing Codes in Norco and Eastvale
Plumbing codes exist to protect your health and your home. When working on bathroom sink plumbing in Norco, Eastvale, Riverside, Corona, or anywhere in Riverside County, it’s important to keep local requirements in mind.
- Importance of Venting: Proper venting allows air into the drain pipe so wastewater flows freely and your P-trap keeps its water seal. Poor venting can cause gurgling, slow draining, and sewer odors.
- P-Traps vs. S-Traps: Modern codes require P-traps. Older homes—especially those built decades ago in areas like Riverside’s historic Magnolia Center—might still have S-traps, which are prone to siphoning and losing their water seal. If you see an S-trap, it’s a good time to plan an upgrade.
- Check with Riverside County Building Department: If you’re altering drain lines or adding new fixtures, check with your local building department (for example, Riverside City Hall or Corona City Hall) for permits and specific code requirements. This helps ensure your work is safe and compliant.
- Wet Venting and Layout: Some layouts allow “wet venting,” where a drain pipe also serves as a vent for another fixture, but this is code-specific and easy to get wrong. When in doubt, have a licensed plumber review your plan.
For a broader look at bathroom plumbing layouts and specifications, you can review the ultimate guide to bathroom plumbing diagrams and layouts. Codes may feel technical, but they’re there to keep your home safe and comfortable.
Conclusion: Your Project is Complete!
You’ve now walked through the essentials of bathroom sink plumbing—from understanding each component to handling basic installation steps and troubleshooting common issues. With a few tools, some patience, and this guide, many homeowners in Riverside, Corona, Eastvale, Norco, Jurupa Valley, and Mira Loma can confidently tackle a sink project on their own.
If you run into something more complex, or you simply prefer a professional touch, our family-owned team at Professional Plumbing IE Inc. is here to help. We’ve been serving Riverside County for nearly 40 years, and we stand behind our work with professional, guaranteed quality service at affordable rates.
For stubborn leaks, recurring clogs, code questions, or full bathroom upgrades, don’t hesitate to reach out. Whether you’re near Sycamore Canyon Wilderness Park in Riverside, close to the Santa Ana River in Corona, in Eastvale’s growing neighborhoods, or along the horse properties in Norco, our plumbers are just a call away.
For any complex plumbing needs or if you just want peace of mind, contact our experts for General Plumbing services. We’ll make sure your bathroom sink plumbing is safe, code-compliant, and built to last.